This news segment is fully dedicated to put a designer in the spotlight. We've asked them about themselves, their creations, their process and their inspirations. This spotlight is for and by Re-Rau!
Let's introduce!
Hi everyone!
This is so exciting! First of all, I wanna thank the team of goSupertools for asking me to be a part of this series. I’m very grateful to be here and I can’t wait to tell you more about my design process.
I’m Maja but on gSm you know me as Re-Rau. I’ve been designing on/off for almost.. 2 years now?! I’m slowly getting more and more confident in my designing technique and style. Last year I joined the manager team in the Community Designers club and I really enjoy being able to make events and getting to know a lot of designers through that.
My gSm journey started on the Danish goSupermodel server when I was 10 years old, which was around 2008, and up until the first site closed down. I’ve always been on gSm for the community and the friends I got through the site and today it’s more or less the same for me. I didn’t design back then, or.. I tried to with the on site tool which was very limited compared to our options now.
But goSupermodel did play a part in me figuring out that I wanted to be a photographer and it was also the first place where I actually shared some of my photographs with other people.
Skip to today where I’m using my knowledge from photo editing to design items on gSm 2.0. That’s pretty cute to think about.
I’d call myself a creative person with many creative hobbies. Besides photography, I do acrylic painting and small crafting projects, like homemade cards, decorations and ceramics. And now digital drawing as well! One can never get too many hobbies… right?
A lot of my designs, if not all of them, are heavily inspired by how I see the world as a photographer. I like odd shapes and bold colors, and I’m trying to mix it all into something wearable that’s both interesting, fun and pleasing to eye.
Sooo, where to begin? When I get an idea to a design, it often starts with me thinking of a certain mood, a color, a clothing style, etc. I use Pinterest to collect inspiration and save pictures in a lot of different not sorted and super chaotic folders with different items and objects that I probably end up not using for inspiration anyway.
Sometimes I stumble upon a picture that takes me in a completely different direction than what I started with and I suddenly scrap everything and starts over in excitement of this new idea. It’s not the most efficient process but it’s my process, lol.
After the Designer tool launched, I’ve been overwhelmed and completely amazed by all the hidden talent we have in the user base! I’m so happy now that more people are able to push their creativity and evolve as artists while making items for the community. There’s room for many different approaches and with something for everyone, whether you’re into fantasy, Y2K, haute couture or campy stuff. That’s what makes it so unique and appealing to me as a designer but also as a regular user.
There’s obviously tons of brilliant community designers that I get inspired by and look up to. Please bear with me as this is not a short list, lmao!
When it comes to my own preferences and what I wear in my outfits the most, some honorable mentions are:
Community Designers only: Jopie, scry, punkt, Auxiliary, No body, no crime, qaz116, Mocks, cries, LauraNadinex, guts, funkywonky, fugleflugten, Fizzarolli, cheat, Eloquinn
Former JDs and GDs: Priestley, Tjili, victoria., Saiorse, Nightwing, goblinbazooka, triptych, aware, St4rlet, Hastings, haavsalt
.. yes, it’s impossible to only choose a few. Luckily there’s no rules for that!!
Other designers I admire and love even if our clothing preferences are like night and day: colliecol, Lulu., Yuuni, Verdana, ssonder, Serena26, Chizumi, alomnia, Wonderstruck
I also wanna shoutout my wonderful Community Designers Club colleagues as well. Every single one of them brings new exciting ideas and high quality items to the community shop:
LostMySoul, cries, Ellie, Vixetoria, Anarki, Mommy, MissAuris
What a line up!.. I’m convinced there’s so many more I’d have liked to mention but just a message for all our designers: You matter and thank you for contributing to the community shop with your art. <3
Re-Rau’s pick n mix tutorial for designing in Photoshop:
I design in Adobe Photoshop with a Wacom pen tablet connected to it. Lucky for me, this is equipment I already use when editing pictures so I didn’t need to buy a lot of new stuff when I wanted to try out digital drawing in the first place.
In Photoshop I’ve made my own brushes for different drawing techniques like shown in this picture (1).
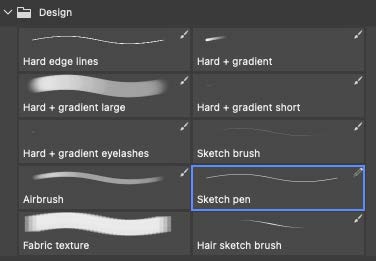
The ones I use the most are: “Sketch pen”, “Sketch brush” “Hard edge lines”, “Hard + gradient” and “Airbrush”. I’ll try to explain in short what each of these brushes do.
- Sketch pen: This brush is literally just 1 single pixel with no effects and texture. I use this for outlining my items and to make sure there’s no pixels with lower opacity than 100% in the outline. (unless intended ofc)
- Sketch brush: A bit like the sketch pen but this one has “texture” and reacts to pen pressure which creates a more natural looking line. I use this for sketching folds and details.
- Hard edge lines: This is the sketch brush but with more definition. Sometimes I start with this if I’m not sure what shape I’m going to make and then draw the outline with the sketch pen afterwards!
- Hard + gradient: As you can see on the picture, this brush starts with a defined line and fade out in the end. This creates more natural fading when drawing details or shadows/highlights.
- Airbrush: It is what it sounds like. A brush that is very soft in the edges with a low opacity. It’s great for smoothing things out or make the colors less contrasted.
While drawing my design, I make sure to use a lot of layers. I’m also doing myself the big favor of naming all my layers which makes it much easier to keep track of the process and coming back if you decide to change something.
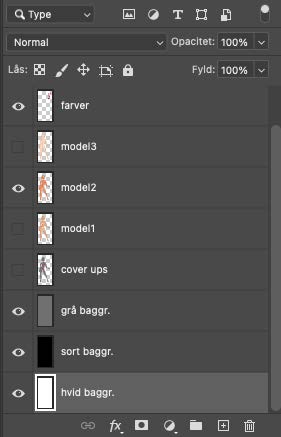 |
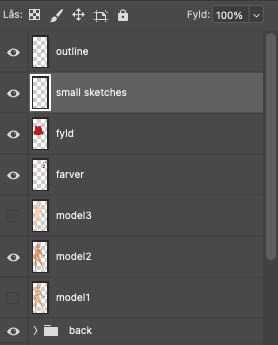
I know what you’re thinking.. Naming the layers?? ugh, can’t be bothered! But thank me later when you figure out how much time and frustration it saves you in the end. Here’s a picture of what my layers look like when I start and when I’m a bit further into designing. My Photoshop is in Danish because I honestly never got around to change it into English. This is also why I use a great mix of English and Danish words, some would call it Danglish, sorryyy! |
As you can see, I have 3 different background layers. Black, white and grey. I mainly use the grey background while drawing and the black and white ones for checking how the light and colors are looking on another background.
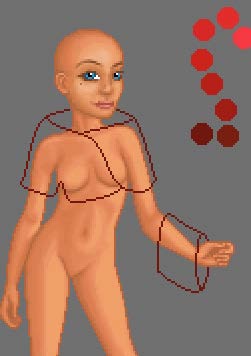
There’s also 4 different model bases, one with underwear, two with none and one that shows what parts of the body that needs to be covered for the underwear to “disappear” when wearing an item.
The top layer is called “farver” which translates to “colors”. On this layer I paint all the colors I wanna use and their shades from dark to bright. I also add more throughout the process and I can always come back and find the original color of something.
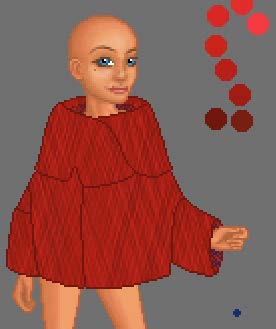
I’m gonna show you how I designed one of my favorite jackets! I designed a 50’s inspired coat with a big “collar” in wool-ish stiff fabric last year. I had a clear picture in my mind of what I wanted it to look like so I started with drawing the shape using my outline sketch pen. This is usually the part that takes me the longest time. I’m a perfectionist (have its pros and cons) and getting the right shape is deciding whether or not I’ll move on with a design.
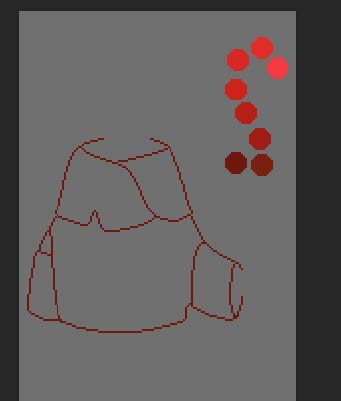
When I was pleased with the outline, I filled it with my main color.
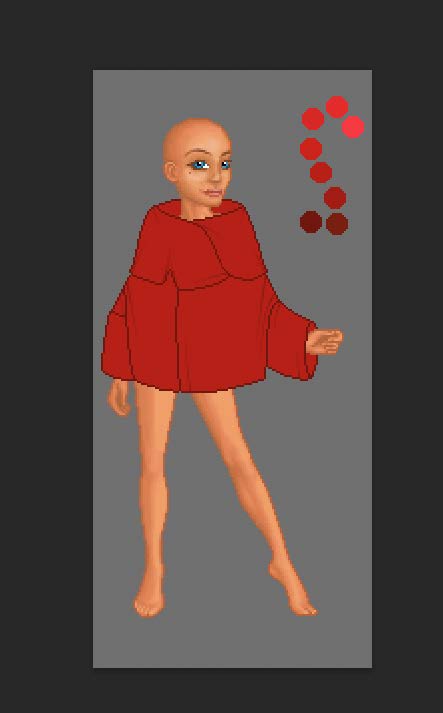
I’m always arranging my layers like shown in this picture. The outline is on top, while “fyld”, which translates to “fill”, is the lowest. I create another layer in between called “small sketches” and I use my “sketch brush” or “hard + gradient” brush to draw folds and other details that need marking.
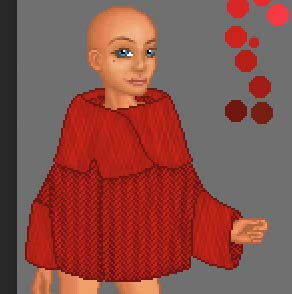
Next step was creating a fitting pattern. I drew a few different ones but this was the one I ended up with. I make sure the pattern is big enough to cover the clothing item I’m designing.
When applying patterns, I lower the opacity of the pattern layer and move it around until it fits for my liking. Stay on your pattern layer and then hold “Command” down and click the “fyld” layer to mark that specific layer.
Press “Command + shift + I” to invent your marking/selection. Now you’re free to delete the remaining parts of the pattern without touching the pattern on the actual item.
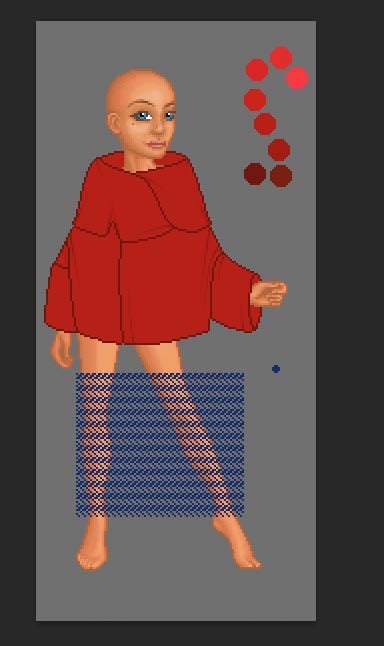
I use this feature for almost everything because I avoid messing up my outline and get floating pixels. As you can see, I did it with the texture on the collar of the coat as well.
There’s of course some bits and bobs that I haven’t mentioned and that’s not shown in the pictures, such as further coloring and shading, but I hope it still stands as a good template or inspiration for some of you to try out!
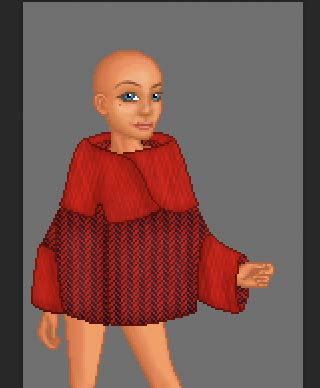
Here’s the jacket when it was almost finished, I only needed to draw some buttons and make recolors. Recolors take a heck of a time so that’s for another tutorial, hahaha.
Voilá!
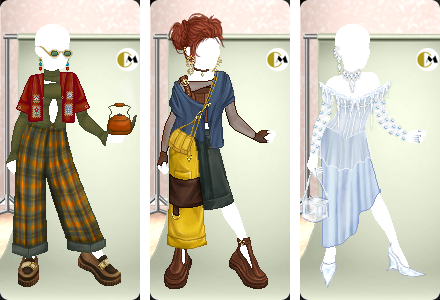
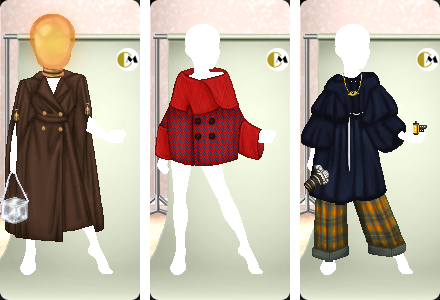
All of my designs are special to me but there’s definitely a few items that stands out to me and that I’m more proud of than others. These are some of them.
I’m ending this interview with a teaser for one of my upcoming designs. I hope you like it! And thank you if you’ve read through all of my blabbing and yapping, it’s much appreciated!
Hugs and smooches from Re-Rau
Re-Rau's: goSupermodel profile, goSupertools profile, design page
Thank you Re-Rau! For this amazing insight in your designs your process of designing! The goSupertools team appreciates the time and effort you've put into the interview. We can't wait to see what you'll create in the future <3
Do you want to be featured in one of these spotlights? Contact one of the goSupertools staff members and we'll have a chat.